This Caramel Cake recipe isn’t just a dessert; it’s an experience, a warm hug in cake form that has become legendary in my family. I still remember the first time I decided to tackle a “from-scratch” caramel cake. I was daunted by the prospect of making real caramel sauce, terrified of burning the sugar or ending up with a sticky, unusable mess. But the lure of a truly authentic, deeply flavored caramel cake was too strong to resist. The aroma that began to fill my kitchen as the caramel simmered – that rich, buttery, slightly burnt sugar scent – was intoxicating. When I finally took that first bite of the finished cake, it was a moment of pure, unadulterated bliss. The cake layers were impossibly moist and tender, infused with a subtle caramel sweetness, and the frosting… oh, the frosting! It was a cloud of buttery, caramel heaven, not cloyingly sweet, but rich and complex. My kids, who usually only go for chocolate, were instantly converted, their eyes wide with delight. My husband declared it the best cake he’d ever had. Since then, this recipe has been my go-to for special occasions, for comforting a friend, or simply when a serious caramel craving hits. It’s a labor of love, yes, but the payoff in smiles and satisfied sighs is immeasurable.
The Irresistible Allure of Homemade Caramel Cake
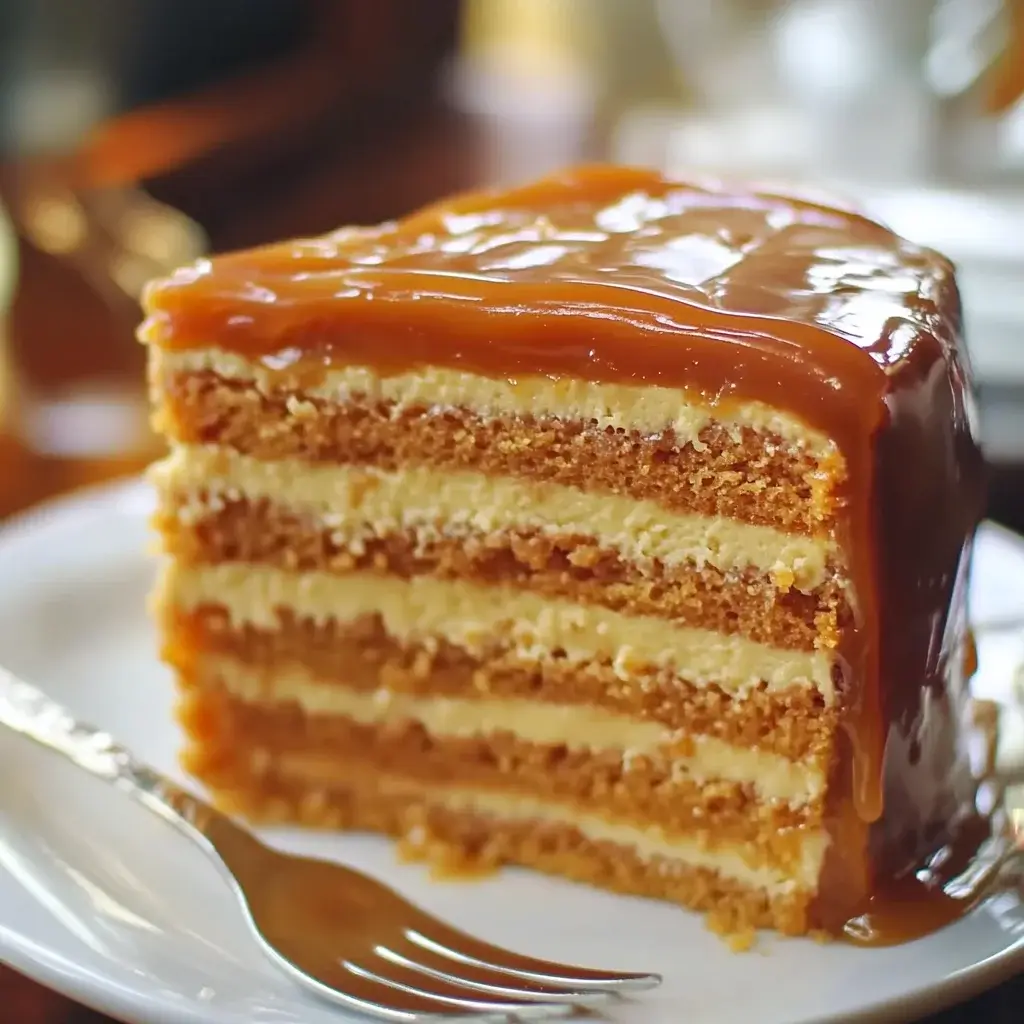
Caramel, with its deep amber hue and complex sweet-toasty flavor, is a culinary marvel. When transformed into a cake, it creates a dessert that is both sophisticated and deeply comforting. This recipe guides you through creating a truly memorable Caramel Cake from scratch, featuring moist cake layers infused with homemade caramel and a luscious, buttery caramel frosting that will have everyone reaching for a second slice. Forget store-bought shortcuts; the authentic flavor achieved here is unparalleled.
Why This Caramel Cake Recipe Stands Above the Rest
You might find many caramel cake recipes, but this one has been perfected to ensure a few key qualities that make it exceptional:
- Unbelievably Moist Crumb: The combination of buttermilk and oil, along with precise mixing, results in cake layers that are tender, moist, and stay that way for days.
- Deep, Authentic Caramel Flavor: We’re not just adding caramel flavoring here. This recipe incorporates homemade caramel sauce directly into both the cake batter and the frosting, providing a rich, nuanced caramel taste that is simply divine.
- Perfectly Balanced Sweetness: While undeniably a treat, this cake is carefully balanced so the caramel shines without being overwhelmingly sugary. The slight saltiness in the caramel sauce and frosting enhances the overall flavor profile.
- Velvety Smooth Caramel Frosting: The frosting is a dream – creamy, buttery, and packed with genuine caramel. It’s easy to work with and tastes even better than it looks.
- Reliable and Achievable: Though it involves making caramel from scratch, the steps are broken down clearly, making it achievable even for those who might be new to caramel-making. Success is within reach!
- A True Showstopper: This cake isn’t just delicious; it’s beautiful. Its golden-brown hue and generous frosting make it a stunning centerpiece for any occasion.
Get ready to impress yourself and your guests with a Caramel Cake that truly delivers on every front.
Gather Your Ingredients: The Foundation of Caramel Perfection
For the best results, use high-quality ingredients and measure them accurately.
For the Homemade Caramel Sauce (used in both cake & frosting):
- 1 1/2 cups (300g) granulated sugar
- 1/2 cup (120ml) water
- 3/4 cup (170g) unsalted butter, cut into tablespoon-sized pieces, at room temperature
- 3/4 cup (180ml) heavy cream, at room temperature or slightly warmed
- 1 teaspoon pure vanilla extract
- 1/2 teaspoon fine sea salt (or to taste)
For the Moist Caramel Cake Layers:
- 3 cups (375g) all-purpose flour, spooned and leveled
- 1 tablespoon baking powder
- 1/2 teaspoon baking soda
- 1/2 teaspoon salt
- 1 cup (227g) unsalted butter, softened to room temperature
- 1 1/2 cups (300g) granulated sugar
- 1/2 cup (100g) packed light brown sugar
- 4 large eggs, at room temperature
- 1 teaspoon pure vanilla extract
- 1 cup (240ml) buttermilk, at room temperature
- 1/2 cup (120ml) of the prepared Homemade Caramel Sauce, cooled
For the Luscious Caramel Buttercream Frosting:
- 1 1/2 cups (340g) unsalted butter, softened to room temperature
- 4-5 cups (480-600g) powdered sugar, sifted
- 1/2 to 3/4 cup (120ml – 180ml) of the remaining Homemade Caramel Sauce, cooled
- 1-2 tablespoons heavy cream or milk (if needed for consistency)
- 1 teaspoon pure vanilla extract
- Pinch of salt
Step-by-Step Instructions: Crafting Your Caramel Masterpiece
Follow these instructions carefully for a perfect Caramel Cake. We’ll start by making the caramel sauce, as it needs to cool.
Phase 1: Making the Homemade Caramel Sauce
This sauce is the heart of the cake’s flavor.
- Prepare for Safety: Caramel making involves very hot sugar. Have all your ingredients (butter, cream, vanilla, salt) measured and ready nearby. Use a medium-sized, heavy-bottomed saucepan (at least 2-3 quarts) to prevent boil-overs.
- Dissolve Sugar: Combine the 1 1/2 cups granulated sugar and 1/2 cup water in the saucepan. Stir gently with a heatproof spatula or wooden spoon just until the sugar is moistened.
- Cook the Sugar: Place the saucepan over medium-high heat. Bring the mixture to a boil without stirring. Stirring at this stage can cause crystallization. You can gently swirl the pan occasionally to ensure even cooking.
- Watch for Color: Continue to cook, swirling the pan as needed, until the sugar syrup turns a deep amber color, like honey or iced tea. This can take 8-15 minutes depending on your stove. Watch it very carefully, as it can go from perfect to burnt quickly. If you have a candy thermometer, you’re looking for about 340-350°F (170-175°C).
- Stop the Cooking (Butter): Once the desired amber color is reached, immediately remove the pan from the heat. Carefully add the 3/4 cup of butter pieces all at once. The mixture will bubble up vigorously – this is normal. Whisk constantly until the butter is fully melted and incorporated.
- Add Cream: Slowly and carefully pour the 3/4 cup of room temperature (or slightly warmed) heavy cream into the caramel mixture while whisking continuously. Again, it will bubble up. Adding cold cream can cause the caramel to seize, so room temperature is best.
- Final Touches: Continue whisking until the sauce is smooth. If you notice any hardened bits of caramel, you can return the pan to very low heat for a minute or two, stirring until smooth.
- Flavor and Cool: Remove from heat (if you returned it). Stir in the 1 teaspoon vanilla extract and 1/2 teaspoon sea salt.
- Cool Completely: Pour the caramel sauce into a heatproof bowl or jar and let it cool completely to room temperature. It will thicken considerably as it cools. This can take 1-2 hours. You can speed this up by placing the bowl in an ice bath, stirring occasionally. You’ll need 1/2 cup for the cake batter and the rest (about 1 to 1 1/4 cups) for the frosting.
Phase 2: Preparing the Moist Caramel Cake Layers
- Preheat and Prep Pans: Preheat your oven to 350°F (175°C). Grease and flour three 8-inch or 9-inch round cake pans. Alternatively, line the bottoms with parchment paper, then grease and flour the parchment and sides of the pans.
- Combine Dry Ingredients: In a medium bowl, whisk together the 3 cups all-purpose flour, 1 tablespoon baking powder, 1/2 teaspoon baking soda, and 1/2 teaspoon salt. Set aside.
- Cream Butter and Sugars: In a large mixing bowl, using an electric mixer (stand mixer with paddle attachment or hand mixer), beat the 1 cup softened unsalted butter on medium speed until creamy, about 1-2 minutes. Add the 1 1/2 cups granulated sugar and 1/2 cup packed light brown sugar. Beat on medium-high speed until the mixture is light and fluffy, about 3-5 minutes. Scrape down the sides and bottom of the bowl as needed.
- Add Eggs: Add the 4 large eggs one at a time, beating well for about 30 seconds after each addition until fully incorporated. Scrape down the bowl.
- Incorporate Vanilla & Caramel: Beat in the 1 teaspoon vanilla extract. Then, with the mixer on low, slowly drizzle in 1/2 cup of the cooled Homemade Caramel Sauce, mixing until just combined.
- Alternate Dry and Wet Ingredients: With the mixer on low speed, add the dry ingredient mixture in three additions, alternating with the 1 cup of buttermilk in two additions, beginning and ending with the dry ingredients. (Dry -> Buttermilk -> Dry -> Buttermilk -> Dry). Mix on low speed until just combined after each addition. Do not overmix. Overmixing can lead to a tough cake.
- Divide Batter: Evenly divide the cake batter among the three prepared cake pans. Smooth the tops with an offset spatula.
- Bake: Bake in the preheated 350°F (175°C) oven for 28-35 minutes (8-inch pans might take slightly longer than 9-inch). The cakes are done when a wooden skewer or toothpick inserted into the center comes out clean or with a few moist crumbs attached. The tops should spring back when lightly pressed.
- Cool Cakes: Let the cake layers cool in their pans on wire racks for 10-15 minutes. Then, carefully invert the cakes onto the wire racks, remove the parchment paper (if used), and let them cool completely before frosting. This is crucial and can take 1-2 hours.
Phase 3: Whipping up the Luscious Caramel Buttercream Frosting
- Beat Butter: In a large mixing bowl using an electric mixer (stand mixer with paddle or hand mixer), beat the 1 1/2 cups softened unsalted butter on medium-high speed for 3-5 minutes until very pale, light, and fluffy. This step is key to a light frosting.
- Add Powdered Sugar: Gradually add 4 cups of sifted powdered sugar, one cup at a time, mixing on low speed until just combined, then increasing to medium speed and beating well after each addition. Scrape down the sides and bottom of the bowl.
- Incorporate Caramel & Vanilla: Add 1/2 cup of the remaining cooled Homemade Caramel Sauce and 1 teaspoon vanilla extract. Beat on medium speed until well combined and fluffy, about 2-3 minutes.
- Adjust Consistency and Flavor: Taste the frosting. If you want a stronger caramel flavor, add more caramel sauce, a tablespoon at a time, up to another 1/4 cup (for a total of 3/4 cup in the frosting). If the frosting is too thick, add heavy cream or milk, 1 tablespoon at a time, until it reaches a smooth, spreadable consistency. If it’s too thin, add a bit more powdered sugar (up to 1 additional cup). Add a pinch of salt to enhance the flavors, if desired. Beat for another minute until perfectly smooth and fluffy.
Phase 4: Assembling Your Caramel Cake Masterpiece
- Level Cakes (Optional): If your cake layers have domed tops, use a long serrated knife to carefully level them for even stacking. This creates a more professional look.
- First Layer: Place one completely cooled cake layer, top-side down (flat side up), on a serving plate or cake stand. Spread a generous layer of Caramel Buttercream Frosting (about 3/4 to 1 cup) evenly over the top.
- Second Layer: Carefully place the second cake layer on top of the frosted first layer. Spread another generous layer of frosting over this layer.
- Third Layer and Crumb Coat (Optional): Place the third cake layer on top (top-side down is often best for a flat top). Apply a thin layer of frosting all over the top and sides of the cake – this is called a “crumb coat.” It traps any loose crumbs. Chill the crumb-coated cake in the refrigerator for 20-30 minutes to firm up.
- Final Frosting: Once the crumb coat is set, apply the remaining frosting generously over the top and sides of the cake, smoothing it with an offset spatula or creating decorative swirls.
- Garnish (Optional): For an extra touch, you can drizzle any leftover caramel sauce (you might need to warm it slightly to make it drizzle-able) over the top of the frosted cake. A sprinkle of flaky sea salt or toasted chopped pecans also looks and tastes wonderful.
- Chill to Set: Chill the assembled cake in the refrigerator for at least 30-60 minutes to allow the frosting to set before slicing and serving. This makes for neater slices.
Nutritional Insights: A Sweet Indulgence
Caramel Cake, like most decadent layer cakes, is a rich treat best enjoyed in moderation.
- Servings: This recipe typically yields 12-16 generous servings.
- Calories per serving (approximate): A single serving (based on 1/14th of the cake) can range from 600 to 800 calories.
This caloric content is an estimate and can vary based on the exact brands of ingredients used, the precise amount of caramel sauce and frosting applied, and the final slice size. The majority of calories come from sugar, butter, flour, and heavy cream. It’s a dessert meant for celebration and enjoyment!
Time Commitment: Planning Your Caramel Cake Bake
Baking this Caramel Cake from scratch is a rewarding process that requires some time planning:
- Homemade Caramel Sauce:
- Active Time: 15-20 minutes
- Cooling Time: 1-2 hours (can be done ahead)
- Cake Layers:
- Active Preparation: 20-25 minutes
- Baking Time: 28-35 minutes
- Cooling Time: 1.5-2 hours (crucial)
- Caramel Buttercream Frosting:
- Active Preparation: 10-15 minutes (can be done while cakes cool)
- Assembly & Chilling:
- Assembly: 20-30 minutes (including crumb coat chill)
- Final Chilling: 30-60 minutes (minimum)
Total Estimated Time (start to first slice, with efficient multi-tasking): Approximately 4 to 5.5 hours, including cooling periods.
Make-Ahead Strategy:
- Caramel Sauce: Can be made up to 1 week ahead and stored in an airtight container in the refrigerator. Bring to room temperature or warm gently before using.
- Cake Layers: Can be baked a day ahead. Cool completely, wrap well in plastic wrap, and store at room temperature.
- Frosting: Can be made a day ahead and stored in an airtight container in the refrigerator. Let it come to room temperature and re-whip briefly before using.
How to Serve: Presenting Your Caramel Creation
Serving this Caramel Cake is a delightful moment. Here are some tips to make it shine:
- Temperature: For the best flavor and texture, serve the cake at cool room temperature. If refrigerated, allow slices (or the whole cake if serving soon) to sit out for about 30-60 minutes before enjoying. This allows the buttercream to soften and the cake crumb to be at its most tender.
- Slicing:
- Use a long, thin, sharp knife.
- For the cleanest slices, dip the knife blade in hot water and wipe it clean between each cut. This prevents the frosting from dragging.
- Presentation:
- Serve on individual dessert plates.
- Garnishes:
- A drizzle of extra caramel sauce (warm slightly if needed for pouring).
- A sprinkle of flaky sea salt on top of the frosting to enhance the caramel flavor.
- A scattering of toasted chopped pecans or walnuts.
- A dollop of lightly sweetened whipped cream on the side.
- Pairings:
- Beverages: A hot cup of freshly brewed coffee (black or with a splash of cream) is a classic. A robust black tea or a milky chai latte also complements the caramel beautifully. For a simpler pairing, a tall glass of cold milk is always a hit.
- Ice Cream: A small scoop of high-quality vanilla bean ice cream or coffee ice cream alongside a slice is pure indulgence.
- Occasions:
- This cake is perfect for birthdays, anniversaries, holiday gatherings (Thanksgiving, Christmas), or any special celebration.
- It’s also a wonderful “just because” treat to brighten a weekend.
The rich golden-brown hues of the cake and frosting are beautiful on their own, but these small touches can elevate the serving experience.
Additional Pro Tips for Caramel Cake Perfection (5 Tips)
- Master the Caramel (Patience is Key): When making the caramel sauce, don’t rush the sugar browning. A deep amber color means deep flavor. Swirl the pan, don’t stir, until the sugar is dissolved and boiling. And always be cautious – hot sugar is extremely dangerous. Have your butter and cream at room temperature to prevent the caramel from seizing violently.
- Room Temperature Ingredients are Non-Negotiable for the Cake: For the cake batter, ensure your butter, eggs, and buttermilk are all at true room temperature. This allows them to emulsify properly, creating a lighter, more even crumb and preventing a dense or curdled batter.
- Don’t Overmix the Cake Batter: Once you begin adding the dry ingredients alternately with the buttermilk, mix only until just combined. Overmixing develops the gluten in the flour, which can result in a tougher, chewier cake instead of a tender one.
- Cool Cake Layers Completely Before Frosting: This is critical. Attempting to frost warm cake layers will cause the buttercream to melt, slide, and become a greasy mess. Patience during the cooling stage (1-2 hours on wire racks) is essential for a beautifully frosted cake.
- Taste and Adjust Your Frosting: The beauty of homemade frosting is control. After adding the initial amount of caramel sauce, taste it. Want more caramel punch? Add a bit more. Too sweet? A tiny pinch more salt can balance it. Too thick? A teaspoon of cream. Too thin? A bit more powdered sugar. Adjust until it’s perfect for your palate.
Caramel Cake FAQ: Your Questions Answered (5 Q/A)
Q1: Can I use store-bought caramel sauce instead of homemade?
A: Yes, you can, but the flavor and consistency might differ. Homemade caramel sauce allows you to control the depth of flavor and sweetness. If using store-bought, choose a high-quality, thick caramel sauce (not an ice cream topping, which can be too thin). You may need to adjust the amount of sugar in the frosting, as store-bought sauces can vary in sweetness. The richness of homemade is hard to beat for this particular cake.
Q2: My caramel sauce seized up or became grainy. What went wrong?
A:
* Seizing (turning hard): This usually happens if cold butter or cream is added to the hot sugar, causing a drastic temperature change. Ensure they are at room temperature. If it seizes, try gently reheating over very low heat, stirring constantly, until it smooths out.
* Graininess/Crystallization: This can happen if sugar crystals get onto the sides of the pan during cooking, or if you stir the sugar syrup too early. To prevent, you can use a wet pastry brush to wipe down the sides of the pan as the sugar cooks. If it’s already grainy, unfortunately, it’s difficult to fix; it’s often best to start over for the smoothest sauce.
Q3: How do I prevent my cake layers from doming too much?
A: Doming can be caused by an oven that’s too hot or too much leavening. Ensure your oven temperature is accurate (an oven thermometer is helpful). You can also try using “bake even strips” (strips of fabric soaked in water and wrapped around the outside of the cake pans) which help the cake bake more evenly from the edges to the center. If they still dome, simply level them with a serrated knife once cooled.
Q4: How should I store leftover Caramel Cake?
A: Because both the caramel sauce and the buttercream frosting contain dairy (butter, heavy cream), the assembled Caramel Cake should be stored in the refrigerator. Cover it well with plastic wrap or place it in an airtight cake container to prevent it from drying out or absorbing odors. It will keep well for 3-5 days.
Q5: Can I make this cake gluten-free?
A: Yes, you can adapt this recipe to be gluten-free by using a good-quality measure-for-measure gluten-free all-purpose flour blend that contains xanthan gum. Ensure all other ingredients (like baking powder) are certified gluten-free. The texture might be slightly different from a traditional wheat-based cake, but it can still be delicious. Follow the recipe as written, substituting the flour.
Ensuring Freshness: Storing Your Caramel Creation
Proper storage will keep your Caramel Cake tasting its best:
- Refrigerate Promptly: Due to the butter and cream in the frosting and caramel sauce, the assembled cake must be stored in the refrigerator.
- Airtight is Key: Store the cake in an airtight cake carrier or cover it loosely with plastic wrap, ensuring the wrap doesn’t stick too much to the frosting. This prevents the cake from drying out and absorbing any ambient fridge smells.
- Longevity: Properly stored, the cake will remain delicious for 3-5 days in the refrigerator.
- Serving from the Fridge: For the best flavor and texture, allow slices (or the entire cake, if you plan to serve it within an hour or two) to sit at room temperature for about 30-60 minutes before serving. This allows the buttercream to soften and the cake crumb to lose its chill, enhancing its moistness and caramel notes.
Can you freeze Caramel Cake?
- Cake Layers (Unfrosted): Yes, individual cake layers freeze beautifully. Cool them completely, then wrap them tightly in two layers of plastic wrap, followed by a layer of aluminum foil or place them in a freezer-safe bag. They can be frozen for up to 3 months. Thaw overnight in the refrigerator or at room temperature before frosting.
- Caramel Sauce: Homemade caramel sauce also freezes well. Cool completely, then transfer to a freezer-safe airtight container. It can be frozen for up to 3 months. Thaw in the refrigerator or at room temperature.
- Frosting: Caramel buttercream can be frozen in an airtight container for up to 2-3 months. Thaw in the refrigerator, then bring to room temperature and re-whip with an electric mixer until light and fluffy again before using.
- Assembled Cake: While possible, freezing a fully frosted Caramel Cake can sometimes affect the texture of the buttercream upon thawing (it might become a bit weepy or less smooth). If you do freeze it, wrap it very well and thaw it slowly in the refrigerator.
Conclusion: A Caramel Dream Come True
This Homemade Caramel Cake recipe is a journey into the heart of sweet, buttery, toasty perfection. From the meditative process of watching sugar transform into liquid gold for the caramel sauce, to the joy of creaming butter and sugar for the impossibly moist cake layers, and finally, to the satisfaction of whipping up a cloud-like caramel frosting, every step is a delight. The result is a showstopping dessert that speaks of warmth, comfort, and true homemade quality. It’s more than just a cake; it’s a celebration in every slice, a recipe destined to become a treasured favorite for its rich flavor, tender crumb, and undeniably luscious caramel embrace. Bake it, share it, and watch the smiles unfold.
Print
Caramel Cake recipe
Ingredients
For the Homemade Caramel Sauce (used in both cake & frosting):
-
- 1 1/2 cups (300g) granulated sugar
-
- 1/2 cup (120ml) water
-
- 3/4 cup (170g) unsalted butter, cut into tablespoon-sized pieces, at room temperature
-
- 3/4 cup (180ml) heavy cream, at room temperature or slightly warmed
-
- 1 teaspoon pure vanilla extract
-
- 1/2 teaspoon fine sea salt (or to taste)
For the Moist Caramel Cake Layers:
-
- 3 cups (375g) all-purpose flour, spooned and leveled
-
- 1 tablespoon baking powder
-
- 1/2 teaspoon baking soda
-
- 1/2 teaspoon salt
-
- 1 cup (227g) unsalted butter, softened to room temperature
-
- 1 1/2 cups (300g) granulated sugar
-
- 1/2 cup (100g) packed light brown sugar
-
- 4 large eggs, at room temperature
-
- 1 teaspoon pure vanilla extract
-
- 1 cup (240ml) buttermilk, at room temperature
-
- 1/2 cup (120ml) of the prepared Homemade Caramel Sauce, cooled
For the Luscious Caramel Buttercream Frosting:
-
- 1 1/2 cups (340g) unsalted butter, softened to room temperature
-
- 4–5 cups (480-600g) powdered sugar, sifted
-
- 1/2 to 3/4 cup (120ml – 180ml) of the remaining Homemade Caramel Sauce, cooled
-
- 1–2 tablespoons heavy cream or milk (if needed for consistency)
-
- 1 teaspoon pure vanilla extract
-
- Pinch of salt
Instructions
Phase 1: Making the Homemade Caramel Sauce
This sauce is the heart of the cake’s flavor.
-
- Prepare for Safety: Caramel making involves very hot sugar. Have all your ingredients (butter, cream, vanilla, salt) measured and ready nearby. Use a medium-sized, heavy-bottomed saucepan (at least 2-3 quarts) to prevent boil-overs.
-
- Dissolve Sugar: Combine the 1 1/2 cups granulated sugar and 1/2 cup water in the saucepan. Stir gently with a heatproof spatula or wooden spoon just until the sugar is moistened.
-
- Cook the Sugar: Place the saucepan over medium-high heat. Bring the mixture to a boil without stirring. Stirring at this stage can cause crystallization. You can gently swirl the pan occasionally to ensure even cooking.
-
- Watch for Color: Continue to cook, swirling the pan as needed, until the sugar syrup turns a deep amber color, like honey or iced tea. This can take 8-15 minutes depending on your stove. Watch it very carefully, as it can go from perfect to burnt quickly. If you have a candy thermometer, you’re looking for about 340-350°F (170-175°C).
-
- Stop the Cooking (Butter): Once the desired amber color is reached, immediately remove the pan from the heat. Carefully add the 3/4 cup of butter pieces all at once. The mixture will bubble up vigorously – this is normal. Whisk constantly until the butter is fully melted and incorporated.
-
- Add Cream: Slowly and carefully pour the 3/4 cup of room temperature (or slightly warmed) heavy cream into the caramel mixture while whisking continuously. Again, it will bubble up. Adding cold cream can cause the caramel to seize, so room temperature is best.
-
- Final Touches: Continue whisking until the sauce is smooth. If you notice any hardened bits of caramel, you can return the pan to very low heat for a minute or two, stirring until smooth.
-
- Flavor and Cool: Remove from heat (if you returned it). Stir in the 1 teaspoon vanilla extract and 1/2 teaspoon sea salt.
-
- Cool Completely: Pour the caramel sauce into a heatproof bowl or jar and let it cool completely to room temperature. It will thicken considerably as it cools. This can take 1-2 hours. You can speed this up by placing the bowl in an ice bath, stirring occasionally. You’ll need 1/2 cup for the cake batter and the rest (about 1 to 1 1/4 cups) for the frosting.
Phase 2: Preparing the Moist Caramel Cake Layers
-
- Preheat and Prep Pans: Preheat your oven to 350°F (175°C). Grease and flour three 8-inch or 9-inch round cake pans. Alternatively, line the bottoms with parchment paper, then grease and flour the parchment and sides of the pans.
-
- Combine Dry Ingredients: In a medium bowl, whisk together the 3 cups all-purpose flour, 1 tablespoon baking powder, 1/2 teaspoon baking soda, and 1/2 teaspoon salt. Set aside.
-
- Cream Butter and Sugars: In a large mixing bowl, using an electric mixer (stand mixer with paddle attachment or hand mixer), beat the 1 cup softened unsalted butter on medium speed until creamy, about 1-2 minutes. Add the 1 1/2 cups granulated sugar and 1/2 cup packed light brown sugar. Beat on medium-high speed until the mixture is light and fluffy, about 3-5 minutes. Scrape down the sides and bottom of the bowl as needed.
-
- Add Eggs: Add the 4 large eggs one at a time, beating well for about 30 seconds after each addition until fully incorporated. Scrape down the bowl.
-
- Incorporate Vanilla & Caramel: Beat in the 1 teaspoon vanilla extract. Then, with the mixer on low, slowly drizzle in 1/2 cup of the cooled Homemade Caramel Sauce, mixing until just combined.
-
- Alternate Dry and Wet Ingredients: With the mixer on low speed, add the dry ingredient mixture in three additions, alternating with the 1 cup of buttermilk in two additions, beginning and ending with the dry ingredients. (Dry -> Buttermilk -> Dry -> Buttermilk -> Dry). Mix on low speed until just combined after each addition. Do not overmix. Overmixing can lead to a tough cake.
-
- Divide Batter: Evenly divide the cake batter among the three prepared cake pans. Smooth the tops with an offset spatula.
-
- Bake: Bake in the preheated 350°F (175°C) oven for 28-35 minutes (8-inch pans might take slightly longer than 9-inch). The cakes are done when a wooden skewer or toothpick inserted into the center comes out clean or with a few moist crumbs attached. The tops should spring back when lightly pressed.
-
- Cool Cakes: Let the cake layers cool in their pans on wire racks for 10-15 minutes. Then, carefully invert the cakes onto the wire racks, remove the parchment paper (if used), and let them cool completely before frosting. This is crucial and can take 1-2 hours.
Phase 3: Whipping up the Luscious Caramel Buttercream Frosting
-
- Beat Butter: In a large mixing bowl using an electric mixer (stand mixer with paddle or hand mixer), beat the 1 1/2 cups softened unsalted butter on medium-high speed for 3-5 minutes until very pale, light, and fluffy. This step is key to a light frosting.
-
- Add Powdered Sugar: Gradually add 4 cups of sifted powdered sugar, one cup at a time, mixing on low speed until just combined, then increasing to medium speed and beating well after each addition. Scrape down the sides and bottom of the bowl.
-
- Incorporate Caramel & Vanilla: Add 1/2 cup of the remaining cooled Homemade Caramel Sauce and 1 teaspoon vanilla extract. Beat on medium speed until well combined and fluffy, about 2-3 minutes.
-
- Adjust Consistency and Flavor: Taste the frosting. If you want a stronger caramel flavor, add more caramel sauce, a tablespoon at a time, up to another 1/4 cup (for a total of 3/4 cup in the frosting). If the frosting is too thick, add heavy cream or milk, 1 tablespoon at a time, until it reaches a smooth, spreadable consistency. If it’s too thin, add a bit more powdered sugar (up to 1 additional cup). Add a pinch of salt to enhance the flavors, if desired. Beat for another minute until perfectly smooth and fluffy.
Phase 4: Assembling Your Caramel Cake Masterpiece
-
- Level Cakes (Optional): If your cake layers have domed tops, use a long serrated knife to carefully level them for even stacking. This creates a more professional look.
-
- First Layer: Place one completely cooled cake layer, top-side down (flat side up), on a serving plate or cake stand. Spread a generous layer of Caramel Buttercream Frosting (about 3/4 to 1 cup) evenly over the top.
-
- Second Layer: Carefully place the second cake layer on top of the frosted first layer. Spread another generous layer of frosting over this layer.
-
- Third Layer and Crumb Coat (Optional): Place the third cake layer on top (top-side down is often best for a flat top). Apply a thin layer of frosting all over the top and sides of the cake – this is called a “crumb coat.” It traps any loose crumbs. Chill the crumb-coated cake in the refrigerator for 20-30 minutes to firm up.
-
- Final Frosting: Once the crumb coat is set, apply the remaining frosting generously over the top and sides of the cake, smoothing it with an offset spatula or creating decorative swirls.
-
- Garnish (Optional): For an extra touch, you can drizzle any leftover caramel sauce (you might need to warm it slightly to make it drizzle-able) over the top of the frosted cake. A sprinkle of flaky sea salt or toasted chopped pecans also looks and tastes wonderful.
-
- Chill to Set: Chill the assembled cake in the refrigerator for at least 30-60 minutes to allow the frosting to set before slicing and serving. This makes for neater slices.
Nutrition
- Serving Size: one normal portion
- Calories: 600 to 800